Tuesday 29 April 2008

Constructive Modelling

Since I am no artist in sketching my looks for models, I feel I need to be more constructive with planning my models. Yes the bird I have created does not look like a pigeon yet but I still love them very much ^^.

My friend and screenwriter managed to get some professional opinions from some amazing animators and modellers at his place down in London. He managed to get 6 of them!? I must admit if I knew he was going to show it to that many, I may of been hesitant to showing them. There feedback was most welcome! ^^. Apparently one of them is an animator spoke a bit too fast for my friend to write them down. I hope to speak with these people in person someday.

After reading the feedback, I have found two interesting practices that I have to keep in practice now ^^

The Constructive Modelling :
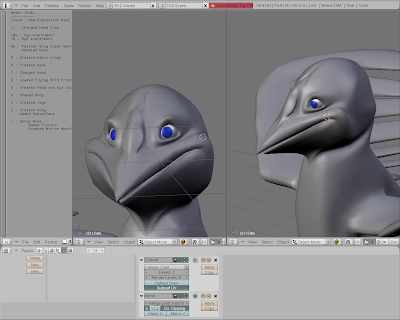
  • Focus on parts are a time, head,body etc. That I should model around 5 different faces first before working on the body. Once I am happy with the face, move on to the next part and create various models of that. Put them ones you like together later ^^
  • Just make sure it is recognisable, It doesn't have to be lifelike... or even realistic. I felt during my recent modelling sessions, that I was worrying too much on detail and this can be time consuming.

Wednesday 23 April 2008

Pigeon Wallpaper

Something silly I cooped up recently. Yet I know they don't look like pigeons so please bare with me. I've been self teaching myself here.

I'm a Digital Frankenstien

Connecting two meshes together muahahaha!. Fun stuff alright.

I done my body with a crap head on it


I then remodeled the head on a basic mesh body.


Thanks to the IRC Freenode channel "Blenderchat", they helped me learn this great trick.
  1. Append either one of the files to have both objects.
  2. Remove or apply any "Mirror" modifiers, so you see meshes in half.
  3. Make sure they are roughly aligned and scaled to proporation.
  4. Press "CTRL+J" to make them as one object, yet they are still spaced out.
Lets Digitally Stitch out newly formed mesh that seems to have a body and head floating.
  1. Select each vertice pair from body neck and head.
  2. Subdivide any edges to help match the vertices count on the head and body. I only had to subdivide twice on the body.
  3. Merge each vertice pair together (Body and head)

It looks like my mesh is having the splits! Lets fix that by
  1. Apply your mirror modifier, make sure "Do clipping" is enabled
  2. Zoom in each of the vertices that are having the splits
  3. Grab those vertices and slide it till the body joins

And it should look something like this :P

Tuesday 22 April 2008

Voice Drafting

You cannot animate much unless the voices are done and recorded. 7 video files, 51mb or 4 hours of messing about with our voices, to try and get the right type of voices for the pigeons. Turns out it was not easy as we thought it was and my screenplay writer lost track of time in doing so. Guess it was us auditioning ourselves for our 3D short.

We used "gtk-recordMyDesktop" which basically is a desktop recorder that also captured microphone input also. So I set the environment to show our script draft to help see what were meant to say. You can install this on almost any Linux distribution, I used Ubuntu.

We must have went through a fair few of characteristic voices. We used the Internet to quickly find some voice examples from popular sitcoms and we would listen to that for around 2minutes. Then we try to replicate it but saying it from your script draft.

Makes me wonder if I should call in on a couple of my theatre and singer friends to do the voice acting. By the way, it was fun ^^.


Monday 21 April 2008

Model Drafting

I must have gone created 4 model designs, made tons of saved files and still cannot get quite the look I want. Guess that is paying attention to detail. This is my latest model of the pigeon. I've noticed every time I remodelled it gets better ^^.


Attention to detail is another reason why I keep remodelling. Soon I see something wrong and looks obvious, then he has to be fixed or it will just bug me.

Tuesday 15 April 2008

Off Topic : Big Buck Bunny

"Big Buck Bunny", a story about "Payback"


Big Buck Bunny - Official Trailer.

I am soo looking forward to it, Blender Insitute's latest masterpiece is FINISHED!!!! They have just had their first premiere at a cinema! All investors will be getting their DVD copies. After a period of allowing their investors to watch their DVD copies, they will release it online! They have slapped all their notes and materials on a USB for Blender users to get everything, called 'The Peach Studio Disk Edition' (Nice idea).

Check Blender Insitute's Peach for more news :)

Thursday 10 April 2008

Magical Trevor Thanks

I have been going through a rough patch in my life and all my close friends are keeping an eye on me in various ways. I recently asked one of them if they could find a couple of spare old 'Optical PS2 mouses'. Instead he decides to buy me them as an early xmas gift! He's currently finishing his degree at Kent University and is planning on going for a 'masters' (I wish him all the best there and I applaud him for making it that far!!!)

I had to say thanks in a special way. So I made him a wallpaper of one of his fav web toons. Go download the image, it's 1600x1200 in size!


I hope I don't get sued here so just to let you know the making of this image. I did not model the mouse but 'Magical Trevor and his hat' only. Also 'Magical Trevor' is a web toon character created by www.weebls-stuff.com

Mouse model can be found at 3DNuts

Monday 7 April 2008

Animals and Birds Eyes to the Front!

I spent a fair while trying to create the head piece to the pigeon. I then remembered from some documentary(Possibly from Pixar) explaining that, you should make the face more human. When modelling cartoon bird characters, the eyes should be to the Front, not from the side. Also not forgetting cheek bones for smiles :P

First Base:


Eyes in Place:


A nice result in the end :)

Wednesday 2 April 2008

My Personal Cheat Sheet

Below are keys for my environment(Linux,Ubuntu,Gnome). This will expand over time

Rendering by Command Line

"blender -b somefile.blend -a -x 1 -F PNG -o /home/user/output.png"


Table Key
SUPER : As in Windows key
RMB : Right Mouse Click
Italics : Original combination (But does not work in my environment)
Modelling
Loop SelectALT+SUPER+RMB
ALT+RMB